Deprecated: Automatic conversion of false to array is deprecated in /home/atiparda/public_html/wp-content/plugins/pixfort-likes/pixfort-likes.php on line 232
نحوه پیکربندی سرور DHCP در سوئیچهای سیسکو
سرویس DHCP به هاستها یا همان دستگاههای میزبان اجازه میدهد تا پیکربندی IP خود را به طور خودکار، از سرور DHCP دریافت کنند. DHCP Server به عنوان یکی از اجزای پروتکل DHCP، در واقع دستگاهی تحت شبکه است که ضمن جای دادن آدرسهای IP و اطلاعات مربوط به پیکربندی در خود، سرویس DHCP را اجرا میکند.
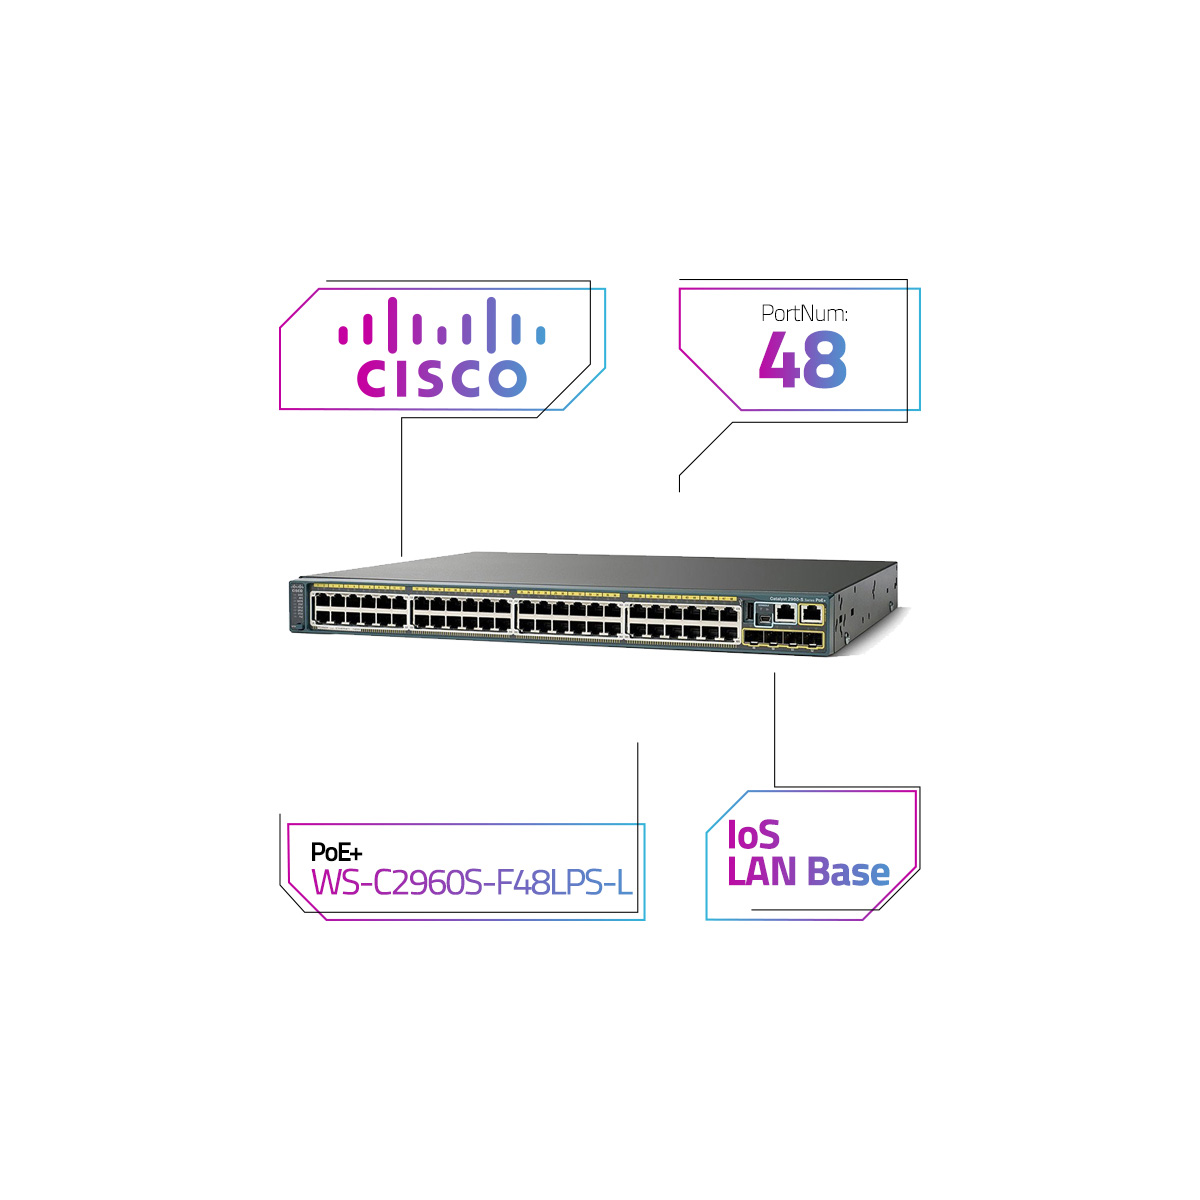
سرور DHCP معمولا یک سرور یا روتر است. اما میتواند هر دستگاه دیگری نیز باشد. خوب است بدانید که سرویس DHCP در سوئیچهای سیسکو هم در دسترس است. یعنی این تجهیزات نیز میتوانند به عنوان سرور DHCP عمل کنند. پس اگر سوئیچ سیسکو در شبکه خود دارید، میتوانید از آن به عنوان سرور DHCP نیز استفاده کنید.
جدول زیر دستوراتی را که برای پیکربندی سوئیچ سیسکو به عنوان یک سرور DHCP مورد نیاز است، برایتان فهرست میکند:
| شرح | دستور |
| برای فعال کردن سوئیچ و ورود به مود privileged exec | Switch>enable |
| برای ورود به مود global configuration | Switch#configure terminal |
| برای ایجاد رنجی از excluded IP addresses یا آدرسهای IP مستثنی شده | Switch(config)#ip dhcp excluded-address [starting address] [ending address] |
| برای ایجاد یک DHCP Pool و وارد شدن به مود پیکربندی DHCP Pool | Switch(config)#ip dhcp pool [pool name] |
| برای تعریف رنچ آدرسهای IP که سرور DHCP باید به مشتریان ارائه دهد. | Switch(dhcp-config)#network [network ID] [subnet mask] |
| برای تنظیم آدرس IP مربوط به gateway پیش فرض | Switch(dhcp-config)#default-router [IP address of default gateway] |
| برای تنظیم آدرس IP سرور DNS | Switch(dhcp-config)#dns-server [IP address of DNS server] |
| برای خروج از مود پیکربندی DHCP Pool | Switch(dhcp-config)#exit |
| برای ورود به مود پیکربندی ویلن: VLAN 1 | Switch(config)#interface vlan 1 |
| برای تنظیم یک آدرس IP در VLAN1 | Switch(config-if)#ip address [any available IP address from the pool] [subnet mask] |
| برای فعال کردن VLAN | Switch(config-if)#no shutdown |
| برای خروج از مود پیکربندی VLAN | Switch(config-if)#exit |
| برای خروج از مود global configuration | Switch(config)#exit |
| برای کپی کردن پیکربندی در حال اجرا یا همان running configuration به پیکربندی زمان راه اندازی یا startup configuration. | Switch#copy running-config startup-config |
پیکربندی DHCP در سوئیچهای سیسکو (از طریق Packet Tracer)
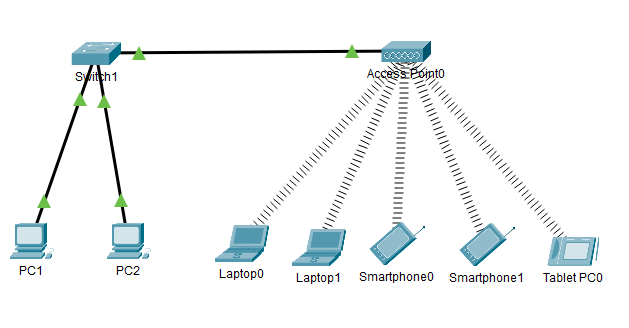
در یک شبکه کوچک، از یک سوئیچ سیسکو و یک اکسس پوینت بیسیم برای برقراری ارتباط بین هاستها استفاده کردهایم. هاستهای سیمدار، مستقیماً به سوئیچ متصل میشوند. هاستهای بی سیم به اکسس پوینت و اکسس پوینت نیز به سوئیچ متصل میشود. تصویر زیر، این شبکه کوچک را نشان میدهد.
هدف:
پیکربندی سوئیچ به نحوی که به عنوان یک سرور DHCP عمل کند.
پیکربندی سرویس DHCP روی سوئیچ:
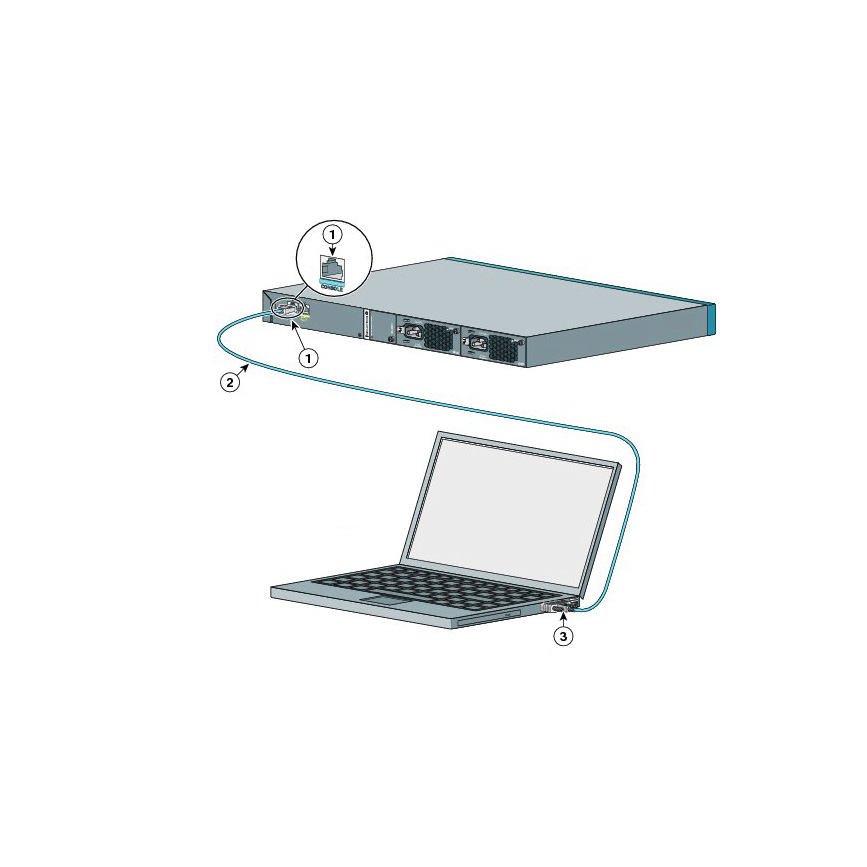
به ابن منظور میبایست به خط فرمان سوئیچ دسترسی پیدا کنید و دستورات زیر را اجرا کنید:
Switch>enable
Switch#configure terminal
Switch(config)#ip dhcp excluded-address 192.168.1.1 192.168.1.10
Switch(config)#ip dhcp pool test
Switch(dhcp-config)#network 192.168.1.0 255.255.255.0
Switch(dhcp-config)#default-router 192.168.1.1
Switch(dhcp-config)#dns-server 4.4.4.4
Switch(dhcp-config)#exit
Switch(config)#interface vlan 1
Switch(config-if)#ip address 192.168.1.5 255.255.255.0
Switch(config-if)#no shutdown
Switch(config-if)#exit
Switch(config)#exit
Switch#
تصویر زیر، نحوه اجرای دستورات بالا را روی سوئیچ سیسکو نشان میدهد:
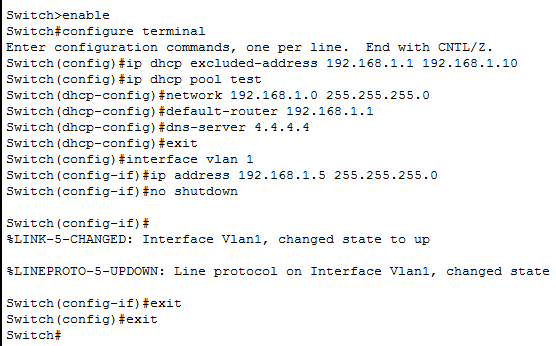
بیایید با بررسی این دستورات، درک بهتری از پیکربندی بالا پیدا کنیم:
ابتدا ما رنجی از آدرسهای IP رزرو شده (192.168.1.1 – 192.168.1.10) را ایجاد کردیم. ما از آدرسهای رزرو شده برای منابعی استفاده میکنیم که نیاز به پیکربندی IP ثابت دارند. مانند روترها، سرورها، چاپگرها و غیره. سپس ما یک مجموعه یا اصطلاحا یک مخزن آی پی (IP Pool)، به نام تست را ایجاد کردیم. ما در این مخزن، رنجی از تمام آدرسهای IP موجود، یعنی 192.168.1.0 255.255.255.0 را تعریف کردیم. این رنج از IP همچنین، شامل آدرسهای IP رزرو شده است که در مرحله اول مستثنی کرده بودیم.
هنگامی که سرور DHCP آدرسهای IP را ارائه میدهد، به طور خودکار آدرسهای IP رزرو شده را از تمام آدرسهای IP موجود حذف میکند. سپس ما گزینههای Default gateway و DNS server مربوط به آدرسهای ip را تنظیم میکنیم. به این ترتیب، ما یک آدرس IP از آدرس IP رزرو شده به Vlan 1 اختصاص دادیم و Vlan 1 را فعال کردیم.
DHCP از آدرس IP مبدأ برای تعیین مجموعهای که باید آدرس IP را از آن ارائه دهد، استفاده میکند. از آنجایی که یک کلاینت DHCP آدرس IP ندارد، پس DHCP از آدرس IP مربوط به ویلن کلاینت، جهت تعیین IP Pool برای آن استفاده میکند.
توجه
ویلنِ کلاینت، ویلنی است که روی پورتی از سوئیچ که به کلاینت متصل است، پیکربندی شده است. به عنوان مثال، اگر یک کلاینت به پورت F0/5 از سوئیچ شبکه وصل شده باشد و Vlan 10 روی پورت F0/5 پیکربندی شده باشد، در این صورت، ویلنِ کلاینت، Vlan 10 خواهد بود.
به طور پیشفرض، همه پورتهای سوئیچ، متعلق به VLAN 1 هستند. این بدان معناست که DHCP از آدرس IPهای Vlan 1 برای تعیین Pool استفاده خواهد کرد. مگر اینکه شما خود، VLANهای اضافی را ایجاد یا پیکربندی کنید.
از آنجایی که ما یک آدرس IP به VLAN 1 از Pool پیکربندی شده خود اختصاص دادیم و هیچ VLAN اضافی ایجاد نکردیم، پس DHCP از Pool ما برای تخصیص آدرسهای IP به همه کلاینتها استفاده میکند.
VLAN درواقع از ویژگیهای مدیریتی سوئیچ است. این ویژگی، به ما امکان آن را میدهد که سوئیچ را از راه دور مدیریت کنیم، هاستهای متصل را دسته بندی کرده و کارهای اضافی زیادی انجام دهیم.
پیکربندی کلاینتهای DHCP
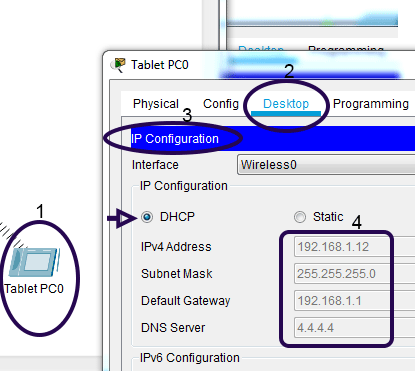
برای پیکربندی یک هاست به عنوان یک کلاینت DHCP، میبایست گزینه IP configuration ِ هاست را به DHCP تغییر دهید. برای این کار، روی دستگاه مذکور و روی گزینه Desktop کلیک کنید. سپس روی گزینه IP configuration کلیک کرده و گزینه DHCP را انتخاب کنید. تصویر زیر، این روش را به صورت گام به گام در packet tracer نمایش میدهد.
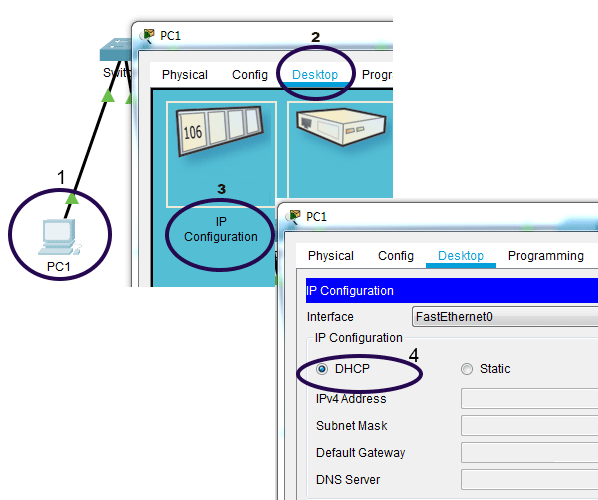
با دنبال کردن مراحل توضیح داده شده در بالا، میتوانید تمام هاستها را به عنوان کلاینتهای DHCP، پیکربندی کنید.
تایید سرور DHCP
اگر میخواهید از اینکه سوئیچ شبکهتان به درستی به عنوان یک سرور DHCP پیکربندی شده است، مطمئن شوید، کافی است گزینه IP configuration از هر هاست متصل به سوئیچ را مورد بررسی قرار دهید.
برای مشاهده گزینه IP configuration از هر هاست، روی هاست کلیک کرده و گزینه Desktop را بزنید. سپس، روی گزینه IP configuration کلیک کرده و آن را چک کنید. تصویر زیر، این مراحل را به شما نشان میدهد:
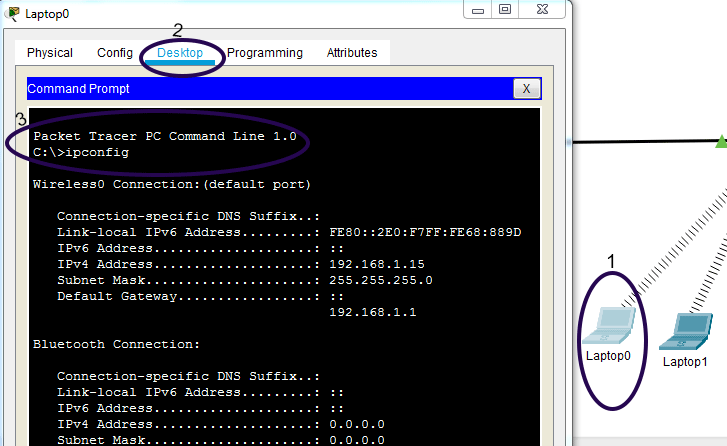
شما همچنین میتوانید از دستور ipconfig برای مشاهده آدرس IP استفاده کنید. برای به کارگیری دستور ipconfig، کافی است command prompt یا خط فرمان دستگاه مذکور را انتخاب کرده و این دستور را اجرا کنید. تصویر زیر، نحوه استفاده از این دستور را به شما نمایش میدهد:
مشاهده آدرسهای اجاره شده و آمار DHCP
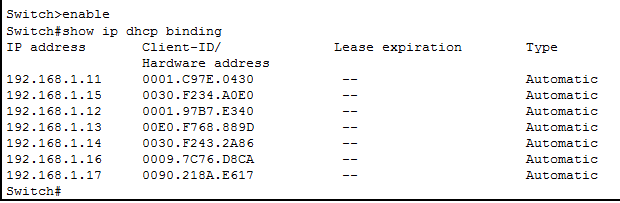
برای دیدن آدرسهای IP اجاره شده توسط سرور DHCP، میبایست از دستور “show ip dhcp binding” در مود privileged-exec استفاده کنید. تصویر زیر، خروجی این دستور را نشان میدهد.
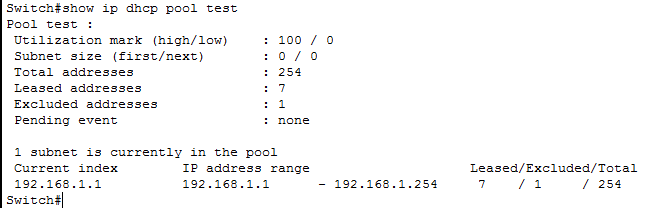
برای مشاهده آمار و اطلاعات Pool DHCP، از دستور ‘show ip dhcp pool [pool-name]’ استفاده کنید. تصویر زیر خروجی این دستور را به شما نشان میدهد: